ImPress 1.1 Documentation
Copyright © 1997-2000
Christopher J. Cox. All rights reserved.
ImPressTM, Copyright
© 1994-2000 Christopher J. Cox. All rights reserved.
Abstract
ImPress is a vector based publishing tool with Slide Show capabilities.
Unlike raster paint programs, ImPress uses selectable objects which can
be manipulated individually. Like all vector based editing packages,
the result is fully scalable graphics.
Table of Contents
1. Main Window
2. Next/Prev Paging Buttons
3. Template Toggle
4. Color Selection
5. Message Area
6. Functionality Tour via Menus
6.1 File Menu
6.1.1 New
6.1.2 Open...
6.1.3 Saving Files
6.1.3.1 Save As...
6.1.3.2 Save Clipart...
6.1.3.3 Save Template...
6.1.4 Print...
6.1.4.1 Print Cmd
6.1.4.2 Print Preview
6.1.4.3 Landscape
6.1.4.4 Print To File
6.1.4.5 Color / Gray Scale
6.1.4.6 All Pages / Select Pages
6.1.4.7 EPS (Encapsulated Postscript Output)
6.1.5 Slide Properties
6.1.5.1 Background Color
6.1.5.2 Circulate
6.1.5.3 Fit to Content
6.1.5.4 Cache Slides on Load
6.1.6 Page Properties
6.1.6.1 Landscape
6.1.6.2 Page Width / Page Height
6.1.7 Exit
6.2 View Menu
6.2.1 Toolbar
6.2.2 Palette
6.2.3 Key Input
6.3 Insert Menu
6.4 Edit Menu
6.5 Layout Menu
6.6 Preferences
6.6.1 Toolbar Preferences
6.6.1.1 Orientation Horizontal
6.6.1.2 Button Size
6.6.1.3 Buttons Per Segment
6.6.2 Unlock Objects
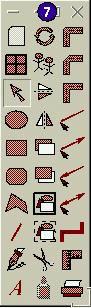
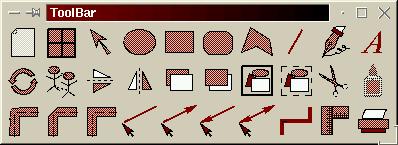
7. Functionality Tour via the Toolbar
7.1 Object Selection
7.2 Object Creation
7.2.1 Oval
7.2.2 Rectangle
7.2.3 Rounded Rectangle
7.2.4 Polygon
7.2.5 Line
7.2.6 Draw
7.2.7 Text
7.2.8 Image (Raster Images) Work in Progress
7.3 Object Manipulation
7.3.1 Moving
7.3.2 Scaling
7.3.3 Rotating
7.3.4 Duplicating
7.3.5 Flipping About Axis
7.3.6 Raising and Lowering
7.3.7 Grouping and Ungrouping
7.3.8 Cutting and Pasting
7.3.9 Object Properties
7.4 Positioning Ruler
8. Miscellaneous
8.1 Slide Mode
8.2 Executable Documents
8.3 EPS Clipart and Editable PostScript
8.4 Fonts and Ghostscript
8.4.1 Using TrueType Fonts with ImPress
8.4.2 Vectorizing Fonts
8.5 Later Versions of Tcl/Tk (e.g. 8.3)
8.6 ImPress Tclet
8.6.1 Enabling ImPress to Load URLs
8.6.2 Saving Files
8.6.3 Embedding ImPress into Your Own Page
8.7 Why ImPress?
End

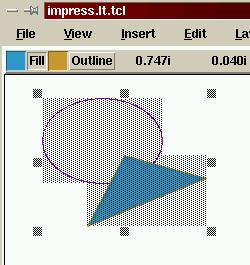
1. Main Window
The main window is where all drawing takes place. Object operations
include:
2. Next/Prev Paging Buttons
These can be used to move forward or backward one page at a time throughout
a document. Alternatively, you can move forward or backward using
the "Page Up" and "Page Down" keys on your keyboard.
3. Template Toggle
When highlighted, whatever the current Template
graphic is will be drawn prior to everything else. If it is not highlighted
then the Template will not be used on that page of the Document.
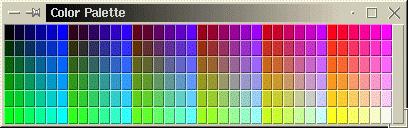
4. Color Selection
Most drawing objects support two different color types: Outline and Fill.
The Outline color is generally used to make the border of a drawing object.
Double Click with Mouse Button 1 on the Outline or Fill buttons to bring
up the Color Palette.
5. Message Area
Instead of "balloon" style hints for every widget, this area will contain
a textual description about whatever widget you have your cursor over.
6. Functionality Tour via Menus
ImPress functionality is easily uncovered by taking a tour through the
menus.
6.1 File Menu
6.1.1 New
Selecting this options will result in an empty document. When ImPress
is running standalone, NOT within a WWW browser, you will be prompted to
save your existing data first.
6.1.2 Open...
All file selection dialogs look similar, here's the one for Open:
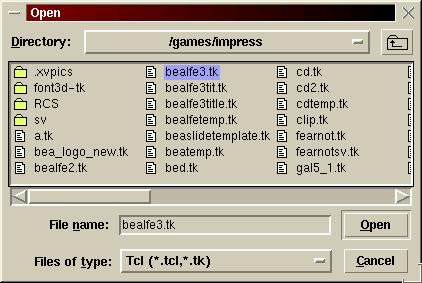
Selecting this option will allow you to open various ImPress type formats:
-
Documents
These can be multiple pages in length and contain necessary device
characteristic information to allow easy printing and slide show capabilities.
-
Templates
A special set of Clipart which will be drawn on all Template
enabled pages. The Template data is drawn first and is lowered
beneath all existing objects on a page.
-
Clipart
A set of objects saved without page or slide knowledge. These
objects will be read into the current page when opened.
Currently, extension style typing of files in not enforced at all in ImPress.
Therefore, you may want to use file naming techniques to distinguish Documents,
Templates and Clipart. For example: cat_doc.tk, cat_temp.tk,
cat_clip.tk.
6.1.3 Saving Files
A pretty generic file dialog is used to save files.
6.1.3.1 Save As...
Selecting this option will allow you to save ImPress Documents.
6.1.3.2 Save Clipart...
Selecting this option will save just objects which are CURRENTLY
SELECTED. They will be saved in standard ImPress Clipart
format which makes it easy to include them in pages of an ImPress Document.
6.1.3.3 Save Template...
Selecting this option will save just objects which are CURRENTLY
SELECTED. They will be saved in a way that makes them a valid
ImPress Template. Template objects are
always drawn first and lower than other objects on any page where Templates
are enabled.
6.1.4 Print...
Selecting this will bring up a Print dialog:
All data for printing out of ImPress is in PostScript format.
You will need either a PostScript capable printer, or a driver capable
of turning PostScript into your printer's native graphics language.
A good example of a PostScript driver for other formats is Ghostscript.
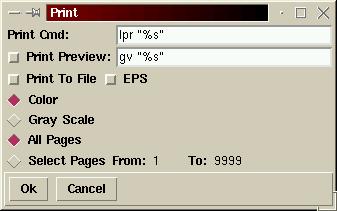
6.1.4.1 Print Cmd
This specifies the command to use to funnel the Postscript output.
Usually this is the name of a program which will spool data to a printer.
A "%s" in the command will be replaced everywhere present with the temporary
file name used in creating the Postscript for printing.
6.1.4.2 Print Preview
This specifies the action and command to execute in order to view the Postscript
output from the current document. A "%s" in the command will be replaced
everywhere present with the temporary file name used in creating the Postscript
for printing.
6.1.4.3 Landscape
Selects the necessary options for printing in the landscape page orientation.
Landscape orientation is where the width is greater than the height of
the page. It is basically taking the default portrait orientation
and rotating it 90 degrees.
6.1.4.4 Print To File
The PostScript data can be redirected into a file. This basically
implements a "save as PostScript" option.
6.1.4.5 Color / Gray Scale
Select one or the other to control whether the output will have color enabled
or not.
6.1.4.6 All Pages / Select Pages
Select one or the other to control whether the whole Document or just selected
contiguous ranges will be output.
6.1.4.7 EPS (Encapsulated Postscript Output)
Selecting this option will print only the encapsulated postscript for each
page. Use a "%d" to have the page number inserted into the filename
on output. This option is used only when Print
To File is also selected. If "%d" is not used in your filename,
then every page will be saved to the same filename overwriting the prior
pages content leaving only the last page in the output.
6.1.5 Slide Properties
This will bring up a dialog for manipulating behavior while viewing the
current ImPress Document in a full screen, borderless, menuless, dialogless
data view mode.

6.1.5.1 Background Color
Although the background color can be controlled with Templates, this technique
is an easy way to set the background to a solid color for showing as slides.
The background color will not show up in Printing. Note: Changing
the Background Color also changes the color of the background while in
normal document editing mode. In either case, the Background Color
will not be output in the printed Postscript. Create a Template
if you want a common printed background.
6.1.5.2 Circulate
This is a fancy way of saying that when the last slide is viewed, moving
to the next slide results in looping back around to the first slide.
6.1.5.3 Fit to Content
Normally scaling for viewing data is based on fitting the entire page on
the display. Selecting this will result in the scaling calculation
to use the bounding box of the actual data instead of the full page.
6.1.5.4 Cache Slides on Load
Page transitions in ImPress can be slow because all of the vector object
content is rendered live....except in cases where the page had already
been rendered. Selecting this option will force the rendering of
every page ahead of time. This will reduce the time between slide
transitions.
6.1.6 Page Properties
This brings up a dialog for manipulating the orientation, width and height
of pages in a Document. It also controls the selection of units:
-
i = Inches
-
c = Centimeters
-
m = Millimeters
-
p = Points (1/72 of an inch)
For example: 8.5i means 8.5 inches, 30c means 30 centimeters.
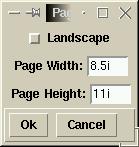
6.1.6.1 Landscape
Selecting this informs ImPress that the Document is to be formatted in
landscape orientation for printing. It is the same as the Landscape
option on the Print dialog.
6.1.6.2 Page Width / Page Height
Use these entries to define the literal page boundaries for the current
Document.
6.1.7 Exit
This will cause the ImPress application to exit. It will prompt you
about saving the existing Document and give an additional confirmation
dialog before terminating.
6.2 View Menu
6.2.1 Toolbar
The collection of convenience buttons known as the Toolbar can be closed
when run in standalone mode. Select this option to make the Toolbar
visible again.
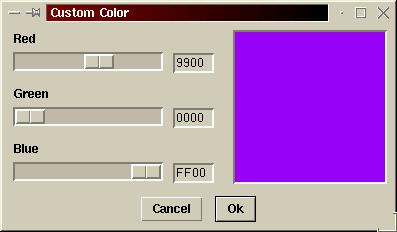
6.2.2 Palette
The large collection of colored buttons known as the Color Palette can
be closed when run in standalone mode. Select this option to make
the Color Palette visible again. Double Clicking Mouse Button 1 on
the button associated with a color selection will also pull up the Custom
Color dialog, the new color will replace the entry on the palette without
affecting objects that used the old color entry. Note: Color Palettes
are not stored with ImPress documents. Modifications to the standard
palette are only good within the current ImPress session.
6.2.3 Key Input
Fonts can contain characters that are difficult if not impossible to input
from a keyboard. Selecting this will bring up a dialog from which
you can select and insert characters for text canvas items.

6.3 Insert Menu
This provides a subset of functionality presented in the Toolbar.
It selects the type of object to be created and inserted into the current
page.
Oval
Rectangle
Rounded Rectangle
Polygon
Line
Draw
Text
Image
6.4 Edit Menu
This provides a subset of functionality presented in the Toolbar.
It is primarily used to select objects and manipulate them.
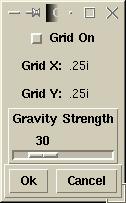
6.5 Layout Menu
These commands control the arrangement of objects on a page. Right
now it consists solely of the Grid dialog.
6.6 Preferences Menu
These commands control the properties of the ImPress application itself.
6.6.1 Toolbar Preferences

6.6.1.1 Orientation Horizontal
The default layout of the buttons known as the Toolbar is vertical.
Selecting this will cause the arrangement to be oriented horizontally.
6.6.1.2 Button Size
The buttons in the Toolbar are drawn objects and easily scale to whatever
size desired. The size is of each button is always square and can
be specified in any of the valid units.
6.6.1.3 Buttons Per Segment
Specifies the number of buttons in a column (Orientation Vertical) or in
a row (Orientation Horizontal).
6.6.2 Unlock Objects
Selecting this option allows you to manipulate objects even if tagged as
Disabled.
7. Functionality Tour via
the Toolbar
Holds buttons which can be used to perform most of the ImPress functions
including:
7.1 Object Selection
Shaped like an arrow, the Select button puts ImPress in selection mode.
-
Single Object Select
Clicking on any drawn object with Mouse Button 1 causes it to be selected.
A bounding box is displayed with corner and side handles for manipulation.
-
Multiple Object Selection by Selection Box
Multiple items can be selected by holding down Mouse Button 1 and dragging
a rectangle around all objects to be selected. Again, a bounding
rectangle is drawn with corner and side handles which encompasses all of
the selected objects.
-
De-Select Object
Individual items may be de-selected by doing a Control-Mouse Button
1 on the object. This will remove that item from the current selection
and readjust the bounding rectangle and corner and side handles.
Clicking Mouse Button 1 on any empty part of the current page will result
the de-selection of all objects.
-
Additive Selection / De-Selection
Additional objects can be added to the current selection by using Control-Mouse
Button 1 to either select single objects or add a group by dragging out
an enclosing Selection Box.
Likewise, doing this technique on objects which are already part of
a selection will result in their immediate de-selection.
Note: Prior to Tk 8.3 (actually worked prior to Tk 4.0 too, I believe),
you could not uses a selection box to select text. I reported this
bug about 2-3 years ago (complete with examples and debugging information)...
it's fixed now.
7.2 Object Creation
The "shape" buttons put ImPress in object creation mode:
Oval
Rectangle
Rounded Rectangle
Polygon
Line
Draw
Text
Image
7.2.1 Oval
After selecting the Oval button or the Oval Menu item, click Mouse Button
1 to start the upper left corner of the bounding box to contain the oval
and hold, drag and release to identify the bottom right corner of the bounding
box. Upon release of Mouse Button 1, the oval will be created.
Ovals are implemented internally as Polygons in order to support object
Rotation. Thus Ovals have the same properties
as Polygons.
7.2.2 Rectangle
After selecting the Rectangle button or the Rectangle Menu item, click
Mouse Button 1 to start the upper left corner of the bounding box to define
the rectangle and hold, drag and release to identify the bottom right corner
of the rectangle. Upon release of Mouse Button 1, the rectangle will
be created.
Rectangles are implemented internally as Polygons in order to support
object Rotation. Thus Rectangles have the
same properties as Polygons.
7.2.3 Rounded
Rectangle
After selecting the Rounded Rectangle button or the Rounded Rectangle Menu
item, click Mouse Button 1 to start the upper left corner of the bounding
box to contain the rectangle and hold, drag and release to identify the
bottom right corner of the bounding box. Upon release of Mouse Button
1, the rounded rectangle will be created.
Rounded Rectangles are implemented internally as Polygons in order to
support object Rotation. Thus Rounded Rectangles
have the same properties as Polygons.
7.2.4 Polygon
After selecting the Polygon button or the Polygon Menu item, click Mouse
Button 1 to start creating vertices for the shape. There must be
a minimum of three vertices placed in order to create a polygon.
When done placing vertices, hit Mouse Button 3, this will create the polygon.
Polygons have the following properties:
-
-fill
This is the color used on the interior of the object boundary, it defaults
to "none" or transparent.
-
-outline
This is the color used to draw boundary of the shape.
-
-smooth
Smoothing turns off or on the spline attributes of the line segments
used to make up the shape boundary. This option requires a boolean
value.
-
-splinesteps
Used to determine the degree of smoothness if smooth is enabled on
the object.
-
-stipple
Defines a bitmap pattern to use in filling the object.
-
-tags
Contains identifiers that name this object. Some tags have special
meaning to ImPress:
-
-width
This defines the thickness of the line used in drawing the outline
of the shape.
7.2.5 Line
After selecting the Line button or the Line Menu item, click Mouse Button
1 to start creating vertices for the line. There must be a minimum
of two vertices (endpoints) placed in order to create a line. When
done placing vertices, hit Mouse Button 3, this will create the line.
Lines have the following properties:
-
-arrow
Determines the number of arrows to draw at the endpoints of the line:
-
none (default)
No arrows.
-
first
Draw arrow at the starting point for the line.
-
last
Draw arrow at the ending point for the line.
-
both
Draw arrows at the starting point and ending point of the line.
-
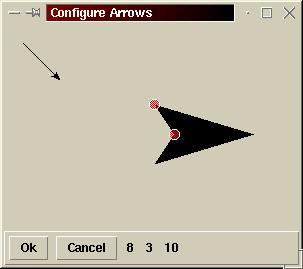
-arrowshape
This option requires a list as an argument. The first element
of the list gives the distance along the line from the neck of the arrowhead
to its tip. The second element gives the distance along the line
from the trailing points of the arrowhead to the tip, and the third element
gives the distance from the outside edge of the line to the trailing points.
Take a look at the Arrow Dialog for a more visual
presentation.
-
-capstyle
Determines the way the endpoints are drawn:
-
butt (default)
The endpoint coordinate is the limit of the line. The line does
not extend beyond the endpoint coordinates.
-
projecting
The actual drawn line endpoints extend half of the width beyond the
actual endpoint coordinates.
-
round
The actual drawn line endpoints extend half of the width beyond the
actual endpoint coordinates in the form of a projecting circle. This
results in lines which have rounded endpoints.
-
-fill
This is the color used to create the line.
-
-joinstyle
Just as capstyle determined the look of the endpoints of the line,
this option determines the look of the line at it's intermediate vertices:
-
miter (default)
The corners of the line (not the endpoints) are extended and drawn
sharply.
-
bevel
The corners of the line (not the endpoints) are angled off.
-
round
The corners of the line (not the endpoints) are rounded.
-
-smooth
Smoothing turns off or on the spline attributes of the line segments
used to make up the line. This option requires a boolean value.
-
-splinesteps
Used to determine the degree of smoothness if smooth is enabled on
the object.
-
-stipple
Defines a bitmap pattern to use in filling the object.
-
-tags
Contains identifiers that name this object. Some tags have special
meaning to ImPress:
-
-width
This defines the thickness of the line used.
7.2.6 Draw
After selecting the Draw button or the Draw Menu item, click Mouse Button
1, hold and begin drawing. Release to end the line drawing.
Draw segments are implemented internally as Lines. Thus Draw
segments have the same properties as Lines.
7.2.7 Text
After selecting the Text button or the Text Menu item, click Mouse Button
1, hold and drag out the bounding box for the text object (Note: actually
it defines the width constraints for wrapping, it does not constrain the
height). Upon release of Mouse Button 1 a Text Dialog window will
appear allowing you to choose your font and the content of the text to
be displayed.
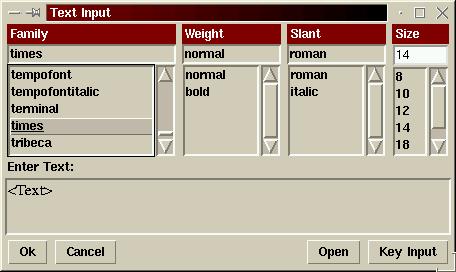
Due to a peculiarity with how the PostScript output works, the Text
object will be actually anchored at the bottom left corner by default.
This means that the object "grows" in height upwards instead of downwards
(which is probably opposite of what you would expect).
Pressing the Open button will open up a file selection dialog to allow
you to bring in text from an external text file.
Pressing the Key Input button will bring up
a dialog which allow for easy insertion of hard to type characters.
Text objects have the following properties:
-
-anchor
Specified the anchor point for the object. Defaults to "sw" (for
the reason stated above). I'm not sure I would change this property.
-
-fill
This is the color used to create the text.
-
-font
This defines the font used to create the text. ImPress uses XFLD
descriptions for fonts. XFLD is a Unix-centric mechanism for describing
fonts and unfortunately it is too flexible and has been the cause for much
confusion. In X11, fonts do not have a hard-coded resolution, and
this is where most of the problem lies. You can pretty much tell
an X11 application to use a 100 dpi font in one area and a 75 dpi font
in another area. ImPress forces the selection of fonts by point size
and uses a 72 dpi setting. This matches up well with the PostScript
output routine and delivers near WYSIWYG output. Yet I digress....see
X
Logical Font Description Conventions for more detail on this.
-
-justify
Determines how the text is aligned:
-
left (default)
-
right
-
center
-
-stipple
Defines a bitmap pattern to use in filling the object.
-
-tags
Contains identifiers that name this object. Some tags have special
meaning to ImPress:
-
-text
This is where the actual text data is defined.
-
-width
This defines the thickness of the line used.
7.2.8 Image (Raster
Images) (Work in Progress)
After selecting the Image button or the Image Menu item, an Image Dialog
will appear. Select an image name from the list or select <ADD
IMAGE> with Mouse Button 1. If <ADD IMAGE> is chosen
then you will prompted for a file to use as the new image and you will
also be prompted to give a logical name to the image.
If you double-click on an Image name in the popup list, you will be
allowed to change the image definition. Use this with caution as
it will change every occurrence of the raster image defined by this logical
name. Double-clicking on <ADD IMAGE> is a quick way of
defining a new image and getting ready to use.
Like Paste, once the Image creation is selected, you must hit the Select
button or a Selection Menu button or another object creation button to
terminate the action of placing images.
Note: Raster images are NOT SCALABLE in ImPress currently.
This is primarily due to a limitation with Tcl/Tk which has very limited
image scaling capabilities. Images are referenced by file name, they are
NOT embedded into the document (though it will handle embedded images if
already present in the file, presumably inserted there manually).
Therefore, remember that a document with images depends upon the location
of the graphic files.
7.3 Object Manipulation
After objects have been created on a page, they can be selected and then
manipulated.
7.3.1 Moving
Move objects by selecting them (not on the handles!) and then dragging
using Mouse Button 1. When the Mouse Button is released, the object
will reside at its new location.
7.3.2 Scaling
Scale selected objects by clicking on a selection handle with Mouse Button
1 and then dragging to the desired scale. The corner handles result
in uniform scaling in the X and Y axis directions. Use the side handles
to perform single axis scaling.
Note: Cannot scale images.
7.3.3 Rotating
Rotate selected objects by clicking on the Rotate button or Rotate Menu
item. Then click Mouse Button 1 on the page wherever you desire the
pivot point to be and drag to see a visible rotation arc. The Message
area turns into an entry dialog which can be used to give exact rotation
values. In order to leave the rotation mode, you will need to click
on the Select button or an object creation tool.
Note: Normal text cannot be rotated. Need vectorized text for
rotation. Images likewise cannot be rotated, though in both cases,
rotation may move the origin point of the object.
7.3.4 Duplicating
Clicking on the Duplicate button or Duplicate Menu item will result in
the immediate duplication of selected objects. They will be offset
in both X and Y coordinates to avoid confusion. The newly duplicated
objects become the active selection. It may be wise to Group objects
if there are multiple object involved prior to duplication to avoid difficult
selection situations.
7.3.5 Flipping about
Axis
Clicking on either the Flip Horiz. or Flip Vert. buttons or their respective
menu items will result in reflecting the selected objects around the chosen
axis.
Note: Cannot flip text about an axis unless it is vectorized text.
Cannot flip images.
7.3.6 Raising and Lowering
Selected objects can be raised or lowered with respect to other objects
on the page by clicking on the Raise/Lower button or Raise/Lower Menu item.
7.3.7 Grouping and Ungrouping
Selected objects can be grouped using the button which shows shapes enclosed
in thick rectangle. Groupings are hierarchical, so you can create
groups of groups. Selecting the Ungroup button, shapes enclosed in
a dashed rectangle, will remove the highest level of grouping on the selected
objects.
7.3.8 Cutting and Pasting
Selected objects can be Cut (removed, yet saved into a clipboard space)
by clicking on the Cut (scissors) button or the Cut Menu item. Pasting
an object requires selecting the Paste (glue) button or the Paste Menu
item. After paste mode has been established, then use Mouse Button
1 to place the contents into the document. Disengage paste mode by
hitting the Select button or an object creation button.
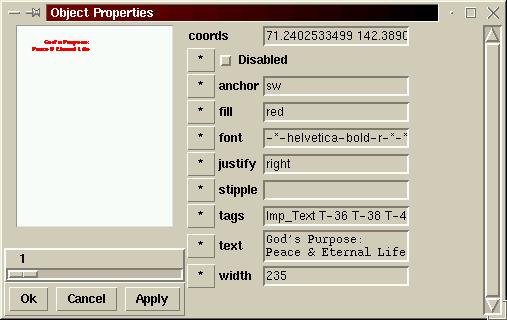
7.3.9 Object Properties
Some of the most popular object property settings are on the Toolbar:
-
Joinstyle
-
miter Button
-
bevel Button
-
round Button
-
Arrows
-
none Button
-
first Button
-
last Button
-
both Button
-
Arrow Shape
Arrow shape is modifiable by doing a Double-Mouse-Button 1 an any of
the Arrow type buttons.
-
Smoothing
Smoothing is either on or off. Choosing this button will cause
all future line/polygon based objects created to have smoothing enabled/disabled
depending upon its current state.
-
Generic
Doing a Double Mouse Button 1 on any object will bring up the generic
property editor. Each object will be queried for its properties and
a dialog panel is created to allow for easy editing. You can use
the slider widget to select which object to manipulate. You MUST
press the Apply button to prepare a change for commit. Pressing the
Ok button will commit your changes to the document. Note:
If you RE-select the Object Properties, all changes you may have made in
the original viewing of the Object Properties is lost... so, don't double-click
on the selection again or invoke the Object Properties from the menu unless
you want to ignore any changes Apply'd so far.
7.4 Positioning Ruler
Clicking Mouse Button 1 once on the Ruler button in the toolbar will activate
positionable rulers, one for the X-axis and one for the Y-axis of the current
page. Clicking the Ruler button once they are displayed will result
in moving them to their default positions at the top and left of the page
respectively. Double clicking Mouse Button 1 on the Ruler button
will remove the rulers from the page.
8. Miscellaneous
8.1 Slide Mode
Uses the command sequence <Alt-S> to switch to Slide Mode. Use
<Escape> to return (or Triple Mouse Button 3). Mouse Button 1
advances a page, Mouse Button 3 goes back one page. Alternatively,
you can use the Page Up and Page Down keys. This now works for ImPress
running in a WWW browser.
8.2 Executable Documents
ImPress Documents, with the exception of Clipart, are valid standalone
applications in addition to being valid formats. Executing a Document
results in the Document coming up in a mini-viewer.
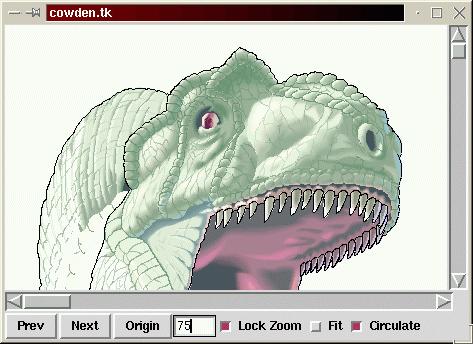
The viewer handles multiple pages which can be navigated using the
Prev (Page Up) and Next (Page Down) buttons. The Origin button will
cause the entire page to be translated to the upper left corner of the
page. The Zoom entry allows you to specify a magnification level
for the page. The Lock Zoom check button will lock the Zoom factor
across all pages while viewing. Fit adjusts the magnification to
make the entire page visible in the current window. The Circulate
check button allows the last page to jump back to the first page when the
Next button is pressed.
8.3 EPS Clipart and Editable PostScript
There is a large number of CD's and downloadable clipart in Encapsulated
PostScript (EPS) format. Most of this clipart is really stored in
formats like Adobe Illustrator, which is a binary file containing the EPS
file. The "transeps" utility provided with this distribution does
a "reasonable" attempt at converting a binary piece of clipart into a form
that can be used with "pstoedit". Pstoedit can also be run on regular
PostScript documents to convert them into a format which ImPress can edit.
e.g.
$ transeps <my.ai >my.eps
Once you have a text piece of EPS clipart, you can use "pstoedit" to convert
the data into ImPress (Tcl/Tk) format.
e.g.
$ pstoedit -f tk my.eps my.tk
Use the Open option in ImPress to get your clipart into the current page.
Pstoedit is a tool by Wolfgang Glunz which supports conversion from
PostScript to a variety of different formats, including Tk. The "Tk"
plugin for "pstoedit" is currently maintained by Christopher
Jay Cox <cjcox@acm.org>.
A newer version of the pstoedit Tk plugin is available which handles
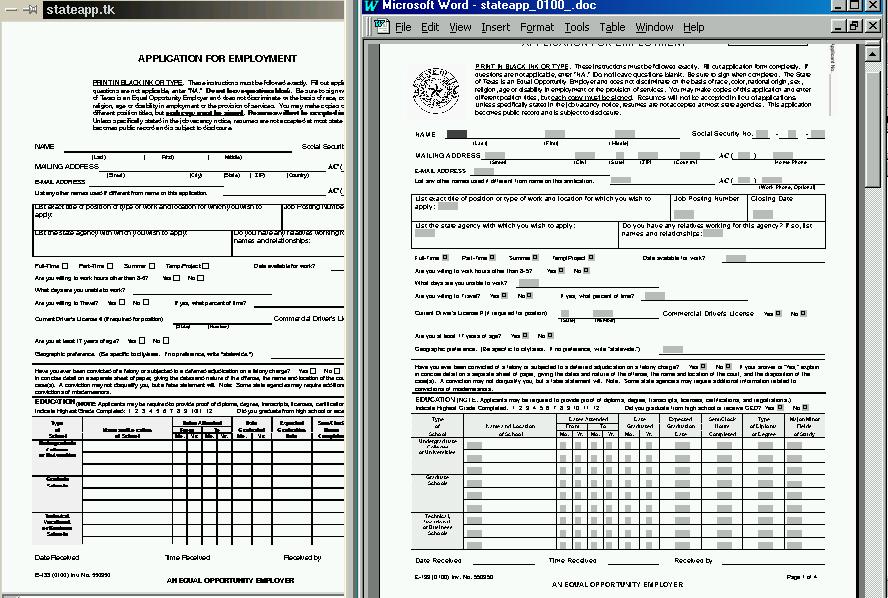
text quite well. You can NOW use pstoedit to allow you to edit PostScript
documents with reasonable results. PostScript files from TeX dvi
output convert ok, but PostScript from Microsoft Word and PowerPoint covert
quite well. Note: PowerPoint uses a landscape orientation which
is a rotated page, since ImPress does not support rotated text, you will
want to convert from a PowerPoint PostScript file created using a 2-up
page layout. This will place two slides on one page, but will preserve
the orientation required by ImPress.
You will notice that in the sample below, the image did not translate.
The new pstoedit Tk plugin does support raster images provided that you have the
Img loadable module for PNG support inside of Tk.
8.4 Fonts and Ghostscript
Ghostscript is an ideal package for taking the PostScript produced by ImPress
and getting it to display or print to non-PostScript devices.
The problem is that there is no relation between the fonts defined in
Ghostscript and X11. The fonts you generally want to use with ImPress
are the scalable PostScript Type I fonts (you can use TrueType too...see
below), but Ghostscript has its own format. Ah Ha! Ghostscript
actually has the ability to use Type I fonts. So all you really need
to do is to define fonts from X11 to Ghostscript. For example, let's
say that you want to use the Bodoni-Bold font. In X11 the XFLD description
is:
-*-bodoni-bold-r-normal--*-240-*-*-*-*-*-*
from file:
bodonib.pfb
This X11 font needs to map to the Encapsulated PostScript (EPS) output
coming from ImPress. Defining a new font to Ghostscript is very interesting.
The "type1inst" program is useful for this. It not only generated
the fonts.dir file but also generated Fontmap entries for Ghostscript.
However, even without this tool, it's pretty straightforward on how do
install GS fonts.
Changing the Fontmap is a matter of associating an PS font name with
the Type 1 file involved.
For example:
/Bodoni-Bold
(bodonib.pdf)
Hopefully now when the Bodoni-Bold font is used, it will use the
font file defined.
8.4.1 Using TrueType with ImPress
Modern version of GNU Ghostscript understand TrueType (.ttf) fonts.
You define them to Ghostscript just like the Type 1 fonts mentioned earlier.
However, in order to see them on your display in ImPress, you will need
to be running a TrueType font server for X11. An example of one server
is "xfstt". The font server when executed usually looks somewhere
for the TrueType fonts to serve and then it listens on a particular port
for requests for fonts. If you have ever used an X11 font server,
it works essentially the same way. You will need to add the font
server and its port to your X11 FontPath. This is usually done either
with configuration files or you can do this dynamically by using "xset".
In the example below, it assumes that the host of the font server is the
host of the X11 server, essentially the font server is local:
$ xset +fp unix:/7101
If the font server is not local:
$ xset +fp inet/nonlocal.host.com:7101
Note: Bad things will happen unless when you want to change "xfstt"
you take the font server out of your FontPath first before stopping "xfstt"
(my X11 server dies). The utility "type1inst" works only with Type1
fonts. You will need "ttmkfdir" to get similar functionality as "type1inst".
8.4.2 Vectorizing Fonts
ImPress does not support many transformations on text (pretty much just
scaling and rudimentary property support). In order to perform more
complex transformation (e.g. rotation) on text, it will have to be converted
into literal drawn objects. Todd Prater's font3d tool does a good
job of doing this. I have made modifications to Todd's work to output
ImPress (Tk) objects. About the only strange thing about this is
that the utility only works on TrueType fonts....which are not directly
supported in ImPress in their non-vectorized form.
Font3d was designed to create 3D vector data which is overkill for ImPress
currently. I have included a sample definition file, font3d.def,
which attempts to minimize the data from the tool.
8.5 Later Versions of Tcl/Tk (e.g. 8.3)
Tcl/Tk continues to evolve. ImPress now attempts to conform to an
earlier version of Tcl/Tk (one that is Plugin compatible) for manipulating
objects and saving files.
One strange side effect has to do with the PostScript generation from
Tcl/Tk canvases (i.e. ImPress drawing page). Window objects are now
printable....therefore, Window objects like the positioning rulers will
show up on print outs (previously, this was a nice feature....anything
in a window would not be output). I'm wrestling with the "right thing
to do" on this currently...for now, just Double Click Mouse Button 1 on
the ruler button in the Toolbar to remove them from a page.
Despite the compatibility feature of ImPress, it is still possible to
embed options especially using the General Properties dialog which are
not portable across different versions of Tcl/Tk. You have been
warned.
8.6 ImPress Tclet
One of the most interesting features of ImPress is that the same code which
runs as a standalone Tcl/Tk application also run in a WWW browser that
can handle Netscape style plugins using the Tcl Plugin. Unlike Tcl/Tk,
the Tcl Plugin has not been maintained and thus it conforms to Tcl/Tk from
the Tcl 3.6/Tk 4.2 days. Most of the features of ImPress in standalone
mode also work inside of a Tcl Plugin enabled WWW browser (e.g. Netscape):
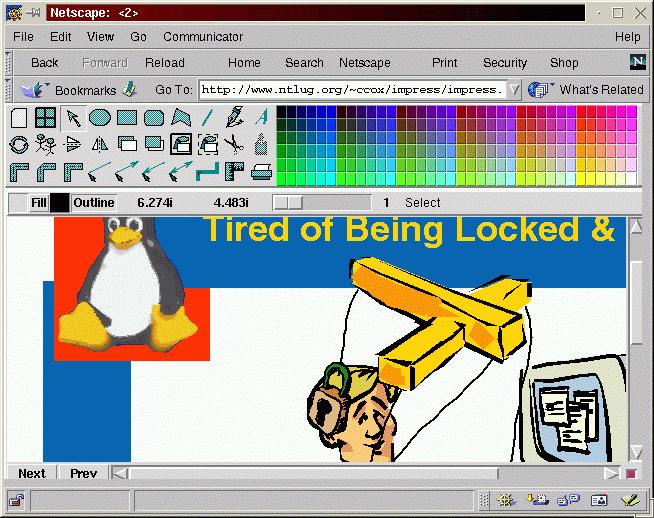
The reason why the toolbar and palette have to be part of the display
is that popup windows from a browser application is pretty much a security
issue. Java gets around this because Java enabled WWW browsers know
to wrap top level windows with some special text to help identify them....still,
even this is a potential security issue.
8.6.1 Enabling ImPress to Load URLs
You have to enable the Tcl Plugin to know about paths which are allowed
to be accessed by ImPress. The file is called plugin.cfg and is usually
under the tclplug/2.0/config directory which is found wherever your browser
decides to to put such things. For example:
/opt/netscape/tclplug/2.0/config/plugin.cfg
Find the section labeled trustedJavascriptURLs. To access the samples
located on the ImPress home site add the the last line show in this sample:
section trustedJavascriptURLs
allow http://sunscript.sun.com:80/plugin/javascript/*
allow http://www.ntlug.org:80/~ccox/impress/*
Now you will be able to access the samples. Clicking on the Page
Properties button on the toolbar brings up the following dialog:

Click on Open... and you will be prompted for the URL you want to load
into ImPress. Note: the default URL will be the location from
which the ImPress application was loaded.
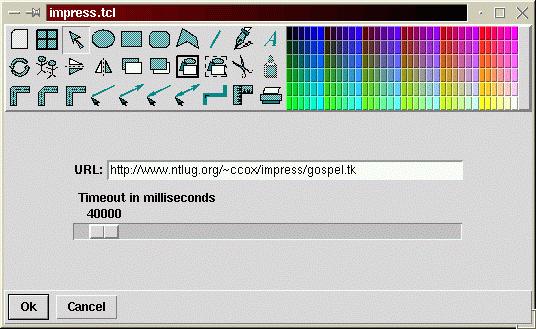
It's that simple. Depending upon your network speed you may want
to increase the "Timeout" delay.
8.6.2 Saving Files
Saving a document is not quite as easy. While it's true that you
can load documents via URLs, you will not be able to save them that way.
However, you can save the file to a disk to which you have access.
So, you can load a document from an area on an accessible disk (which may
be a remote disk) OR via URL and save to an area on an accessible disk
(which may be a remote disk). However, there is a bug (?) in Netscape
which causes the "progress" dialog from Netscape to not go away even after
the document is saved. In fact, the only way to eliminate the "progress"
dialog is to exit Netscape. Note: Maybe I'll figure out a better
way to do this someday...if anyone knows a way around this, please share
the information!
8.6.3 Embedding ImPress into Your Own Page
In order to load ImPress into a browser page, you can either load it directly
by URL (e.g. http://www.ntlug.org/~ccox/impress.tcl) or you can embed it
into a page with something like:
<embed src=impress.tcl width=600 height=400>
You can also use a javascript launcher. Below is an example of using
Javascript and HTML to launch ImPress when a button on a page is pressed
(Note: ImPress uses the file= parameter to optionally tell it to load
a file when starting):
<SCRIPT LANGUAGE="JavaScript">
function impress(name) {
    var newWindow
    var winwidth
    var content

    if (screen.availWidth > 800 ) {
        winwidth = "800"
        wintwidth = "775"
        winheight = "600"
        wintheight = "575"
    } else {
        winwidth = "600"
        wintwidth = "575"
        winheight = "480"
        wintheight = "455"
    }

    newWindow = window.open("","ImPress","scrollbars,menubar,height=" +
        winheight + ",width=" + winwidth)

    content="<embed src=impress.tcl "+
        "type=application/x-tcl height=" + wintheight + " width=" +
        wintwidth + " file=" + name + ">"
    newWindow.document.write(content)
    newWindow.document.close()
}
</SCRIPT>
<FORM>
<INPUT TYPE="button" VALUE="Gospel Tract" onClick='impress("gospel.tk")'>
</FORM>
8.7 Why ImPress?
Ok. So what's the big deal? Yet Another Vector Drawing Package...
I actually began writing ImPress in 1994. Back then, Tcl/Tk was
VERY hot!! Tcl/Tk was being used everywhere to create very powerful
graphical applications in an extremely short period of time. Enamored
with the technology was probably one reason to create ImPress, but there
was a more compelling one...
Linux. At that time, Linux lacked any reasonable desktop-ware,
especially in the area of presentation packages (ala Microsoft PowerPoint).
Since Tcl/Tk made creating an editor very easy, it seemed reasonable to
develop the package since I have a very tight time budget (pretty normal
family, church and occupation responsibilities).
And now, I do the vast majority of my Linux presentations using ImPress.
I know that I'm committed to Tcl/Tk with this project. It's been
more than a rough ride though...but not nearly as rough as the Java ride
from Sun!! Java clearly has momentum despite being a much lower level
programming language.
ImPress does what it does very well considering that it is all 100%
Tcl/Tk. I hope that you will enjoy using it as much as I enjoyed
creating and maintaining it. I estimate that it would have taken
approximately 10 times more effort to create a Java version of this product....a
lot more code and a lot more pain.
End
Feel free to contact me regarding
ImPress or Linux.